If you cannot do a single push-up yet, start with the easiest version you can finish with a straight body and controlled movement, then work your way down the ladder one step at a time: wall, countertop incline, knees, partial floor, full floor. Skipping steps is the reason most beginners stall at zero.
Learning how to do push ups if you cannot do one yet is mostly about picking the right starting height and staying honest about form. Two or three short sessions a week, done for a few weeks, move most people further than a hard session that ends in frustration.
You are in bigger company than you think. A Gymless survey of more than 1,400 US adults found that over a third could not complete five push-ups in a row. It is normal, and it is trainable.
Here is why the ladder works. Kinetic research (Ebben and colleagues, 2011) puts the load on your arms and chest at roughly 64% of body weight in a standard push-up, around 49% in a kneeling push-up, and lower still in a modified version. A wall or countertop variation simply takes away some of that load, so you can practise the pattern before you can push the full amount.
Table of Contents
- What You Need
- Step-by-Step: How to Do Push Ups If You Cannot Do One Yet
- 1. Set Up a Safe Starting Position
- 2. Try Wall Push-Ups
- 3. Move to Incline Push-Ups
- 4. Perform Knee Push-Ups
- 5. Use a Partial Floor Push-Up
- 6. Build Toward One Full Floor Push-Up
- 7. Practice a Simple Beginner Routine
- Common Mistakes
- Frequently Asked Questions
- Can a complete beginner do push ups?
- Which push-up variation is easiest for beginners?
- Are knee push-ups a useful way to learn?
- How many push-ups should a beginner practice each day?
- What should I do if push-ups hurt my wrists, shoulders, or back?
- Conclusion
What You Need
Nothing. That is the useful part. Every variation below uses something already in your house or nothing at all.
- A solid wall for wall push-ups, ideally smooth so your palms do not slip.
- A sturdy chair, counter or table for incline push-ups. Press hard on it first; if it slides or wobbles, choose something else.
- An exercise mat or a carpeted floor, so your knees and wrists have something soft under them.
- Supportive footwear or bare hands on a non-slip surface. Shoes give you a better wrist angle and more grip on a smooth floor.
- About a metre of clear floor space, with no rug edges, cables or furniture behind you.
If you have wrist, elbow, shoulder or back pain, are pregnant or postpartum, are returning after an injury, or simply feel unsteady standing, check with a doctor or physical therapist before starting. That is general advice, not a diagnosis, and it matters more than any rep count.
Step-by-Step: How to Do Push Ups If You Cannot Do One Yet
The progression runs from most support to least support, and you move down only when the current level feels easy. Do not jump ahead because a level looks easy on video. Two clean repetitions at the right height beat ten sloppy ones every time.
1. Set Up a Safe Starting Position
Stand or kneel tall, take one breath in, and brace your stomach as if you are about to be lightly bumped. Squeeze your glutes and pull your shoulder blades down and away from your ears. That brace is the whole secret: it keeps your torso from sagging once your arms start working.
Place your hands wider than your shoulders for wall and incline work, directly under your shoulders once you are on the floor. Keep your neck in line with your spine, so your eyes look at the floor a short distance ahead rather than craning forward.
If you cannot hold that position at all, start from your knees on the floor instead of standing. If you feel sharp pain rather than ordinary muscle effort, stop for the day.
2. Try Wall Push-Ups
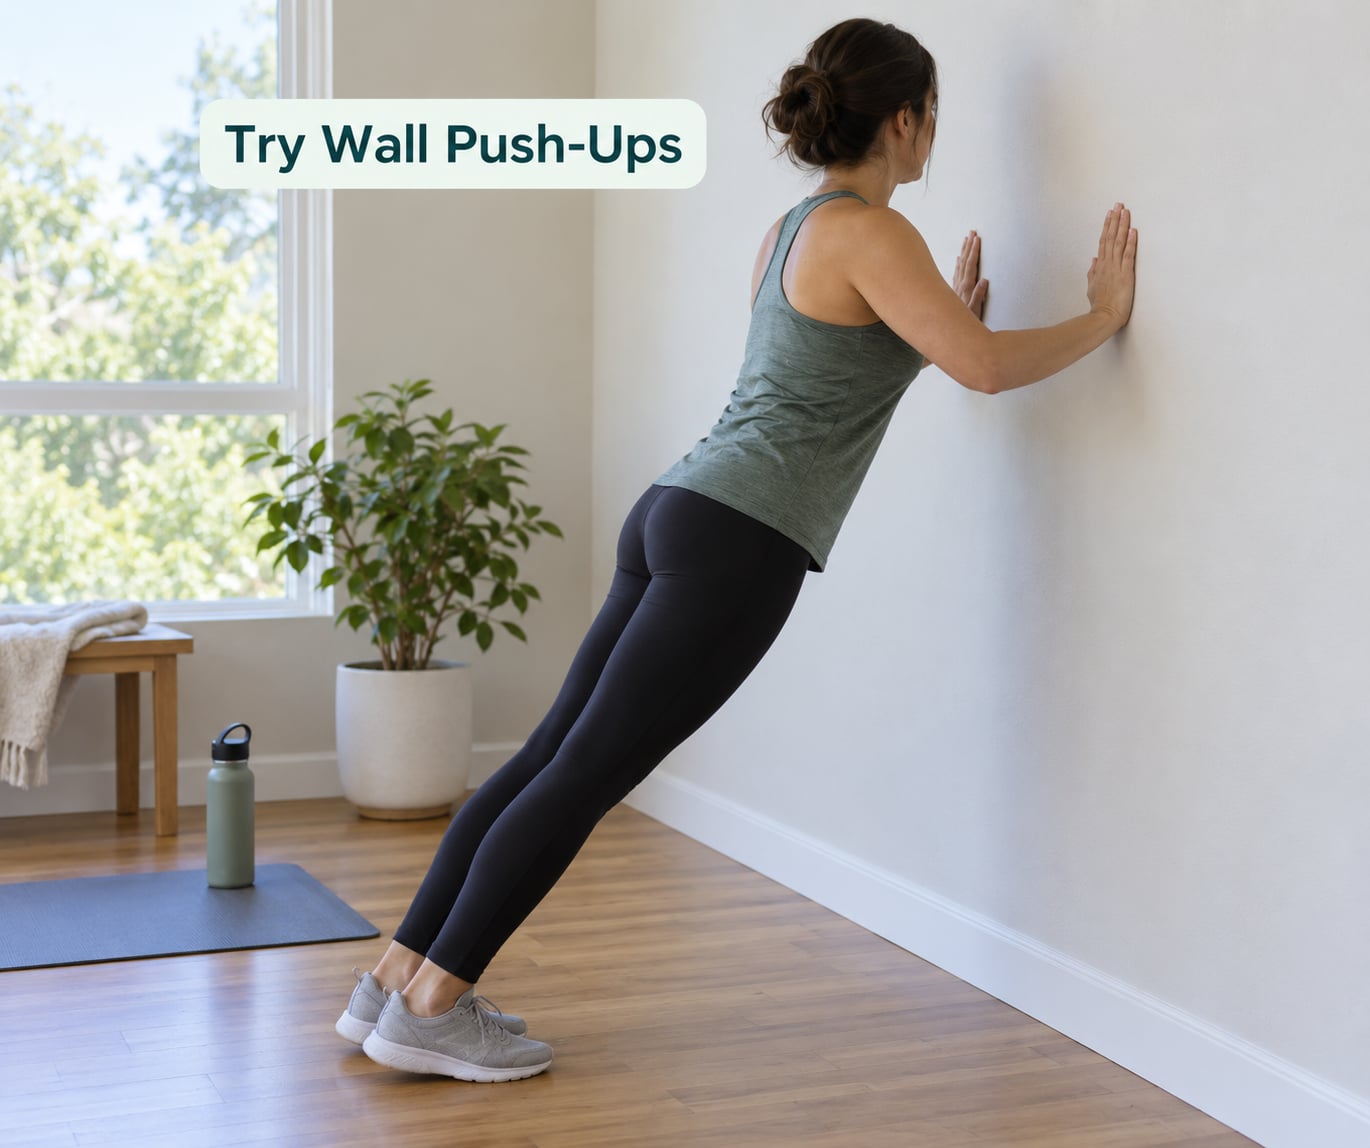
Stand about a step and a half from a wall, feet together or hip-width apart, and put your palms on the wall at chest height. Walk your feet back until your body is one straight line from head to heels, then bend your elbows to bring your chest toward the wall.
The wall is usually the easiest entry point because your arms carry only a fraction of your weight. If your elbows fly out at shoulder height, angle your hands slightly and point your elbows down and back at about 45 degrees. Measure progress by distance, not reps: when you can do 10 to 15 wall reps with clean form on two separate days, walk your feet a little further back.
3. Move to Incline Push-Ups
Put your hands on a sturdy counter, tabletop or the seat back of a chair. Start higher than feels necessary, keep your body in one line, and lower your chest to the surface with control before pressing away.
The surface height is what sets the difficulty, not the exercise name. Countertop height is harder than a kitchen worktop, and both are harder than a low coffee table. Use the table until 3 sets of 8 to 10 feel comfortable, then test the next height down. When you can no longer hold a straight line, go back up a level rather than pushing through.
4. Perform Knee Push-Ups
Kneel on a mat with your knees under your hips and your hands under your shoulders. Extend one leg at a time back until you are in a modified plank from knees to head. Squeeze your glutes so the line stays flat, then lower your chest with control and press back up.
Progress from partial to full knee push-ups by lowering closer to the floor, not by moving faster. Stop the set the moment your hips drop or lift. Do not rest on the floor between reps, because that turns it into a different exercise and lets you accumulate more reps than your shoulders can handle.
If your wrists complain immediately, make fists under your palms so your wrists stay straight, use push-up handles, or raise your hands on a low step while keeping the rest of the body the same.
5. Use a Partial Floor Push-Up
From hands and knees, walk your feet back into a plank position, then lower only partway, stopping when your elbows reach about 90 degrees or when your chest is a hand-width from the floor. Press back up. A smaller range of motion is safer than forcing a full repetition.
This is where most people get their first real floor reps. It builds the part beginners lack, which is holding the plank while the arms are loaded. Negative-only work works well too: lower yourself as slowly as you can in three or four seconds, then drop to your knees and rest.
6. Build Toward One Full Floor Push-Up
From a comfortable plank, lower your chest all the way to the floor, keeping a flat line and elbows at 45 degrees, then press back to straight arms. Take a breath on the way down and breathe out as you push. Stop the set when your form changes, not when a number says so.
Use one simple rule for progression: add repetitions until you hit the top of the range with clean form, then reduce the range slightly and start again. That is progressive overload in its most basic form. When 3 sets of 10 full reps look boring, move to decline push-ups with your feet on a chair, or add tempo work.
7. Practice a Simple Beginner Routine
Pick the variation you can complete for 3 to 5 clean repetitions. Do 3 sets, resting 60 to 90 seconds between them, on three days a week with at least a day off between sessions. That volume is small on purpose.
For people who dislike structured plans, spread the work out instead. A few sets of 2 or 3 repetitions, five or six times across the day, is the approach often called greasing the groove. The sets stay far below failure, so you practise the movement daily without recovering from fatigue.
Track what you did each session in your phone. Progress gets easier to see when you write down 3 sets of 4 on Monday and 3 sets of 7 two weeks later, and it stops you from advancing when you are not ready.
Common Mistakes
- Hips sagging or lifting into a pike. Squeeze your glutes and shorten the range of motion before adding reps. A flat body is worth more than depth.
- Elbows flaring straight out to the sides. Bring them closer to your ribs and rotate your hands so your elbows track back at about 45 degrees. This also eases the shoulder.
- Half repetitions with no full lockout. Finish with straight arms and shoulders down. If you cannot, shorten the movement rather than faking the top of the rep.
- Head craning forward. Keep your neck neutral and look at the floor a short distance ahead. Move the hands slightly if the floor seems far away.
- Holding your breath. Breathe in on the way down, out on the push. Breath-holding spikes pressure and makes you lose control at the bottom.
- Rushing reps to hit a number. Three seconds down, one second up. Slow reps fix form faster than adding volume.
- Progressing too quickly. Move down a level when 3 sets of 8 to 10 feel easy, not when a single set feels hard.
- Ignoring wrist discomfort. Raise the surface, use fists or handles, or angle the hands back. Sharp or lasting pain needs a professional opinion rather than a workaround.
A few general safety habits cover most of it. Warm up with two minutes of easy movement such as marching or arm circles. Leave a clear space, keep the mat flat, and stop the set when your shoulders pinch or your back arches.
Frequently Asked Questions
Can a complete beginner do push ups?
Yes. Push-ups are one of the most scalable bodyweight movements there is, because you can change the leverage instead of the load. Wall, countertop, kneeling and half range of motion versions all train the same pressing pattern. Start with whichever version you can complete for 3 to 5 clean repetitions, then build from there.
Which push-up variation is easiest for beginners?
The wall push-up is usually the easiest, followed by incline push-ups on a countertop or sturdy table. The higher the surface sits relative to your body, the less of your weight your arms take over. That is why you can climb the ladder one surface at a time instead of jumping straight to the floor.
Are knee push-ups a useful way to learn?
Yes, they are genuinely useful for learning the movement pattern. They cut the load roughly in half compared with a full push-up, which lets you practise hand placement, a straight line from knees to head and a controlled lowering without fighting through the bottom position. Drop them once you can do 3 sets of 8 to 10 with clean form.
How many push-ups should a beginner practice each day?
Most total beginners do best with about 3 sets of 3 to 5 repetitions, three days a week, leaving roughly 48 hours between sessions. If the sets feel easy, add a few repetitions before moving to a harder variation. Consistency matters far more than volume during the first few weeks.
What should I do if push-ups hurt my wrists, shoulders, or back?
Change the movement rather than pushing through pain. For wrists, raise the surface, use push-up handles or make fists under your palms. For shoulders, keep elbows closer to the body and reduce the range. For the back, hold a flat line from head to knees. Sharp or lasting pain deserves a check with a doctor or physical therapist.
Conclusion
The road from zero to one full push-up runs wall, incline, knees, partial floor, full floor, and every step in between has a clear exit rule: 3 sets of 8 to 10 with a flat body and elbows at 45 degrees.
Start today at the easiest version that keeps your form intact, do three short sessions a week, and let the number of reps rise before the difficulty does. If push-ups cause pain, or you have an injury or medical condition that makes training a question, talk to a doctor or physical therapist first.